Feeds:
Posts
Comments

Just recently i joined ArtFire.com. I heard about ArtFire.com from Starving [Jewelry] Artists Forum. I only heard good things about them so I thought “why not?“.

What is ArtFire.com?
It’s a Buy and Sell Handmade website similar to the widely known Etsy.com. So why would you want another? Because, Joining is FREE and Selling is FREE too! How awesome is that! Only with your free membership, there are some limitation such as you’re only allowed to sell 10 items in your store at once and limited number of pictures uploaded for each item. However, for a free deal, that is not bad at all! NO COMMISSION FEE and NO LISTING FEE for each sale either! For Buyers, you can always join for free 🙂

Now, where would ArtFire.com get the money to fund their website? They have provided an option of paid membership of $20/month. Although it may sound a bit steep at first, but I can assure you that it’s not expensive at all considering they only take that and NO MORE! NO listing fee, NO commission fee per sale, absolutely NOTHING MORE than that $20/month.

What could be better than that?

Ok, right now they’re offering $12/month for limited time with absolutely no commission fee and no listing fee! I say it’s a very good deal! They have a Referral Program that might get you a chance of Free Membership with unlimited access that only Paid Members got. Get another 10 people to join ArtFire.com to get your free membership! So, what are you waiting for? Quick! Register on ArtFire.com NOW! This offer doesn’t last forever! Referral Program is only running until April 22, 2009.

Register on ArtFire.com NOW!


EDIT: 07/12/2008

Today I uploaded a bunch of stuffs in ArtFire.com and their one stop uploading page is pretty awesome. Not 5 page steps like etsy. They also got a bulk picture uploader so it’s been pretty nice. My uploading experience was a quick and a pleasant one. Editing a post also simple and fast.

😀


-K-

This Blog Has Moved

Visit http://kaysommers.blogspot.com for recent and rapid updates 🙂

Visit http://popnicute.artfire.com for awesomely unique handcrafted jewelry.

Visit http://popnicutesupplies.artfire.com for handmade jewelry supplies.

Love,
-K-

This tutorial is about maximizing the use of an automatic digital camera for us ordinary people with no expensive pro cameras 🙂

I’ve ranted a bit in the forums in the past on how sucky my pictures were since I only had an automatic digital camera. And since using flash clearly didn’t work on taking good pictures, I tried to follow the suggestions people made about using the day light as the main light source. By using this technique, surprisingly, my pictures become a whole lot better! No flash flare on my jewelries and no harsh shadows under my objects.

TOOLS I used: an automatic digicam, a computer chair, background cloths/papers & various additional objects.

After a few tries, I found the best way to shoot my jewelry:

1. Use the Flower mode. In my automatic digicam, there are “Best Shot” modes where you can select different pre-set camera modes conditioned for different lighting situations and purposes. After a few experiments, I found that the Flower mode was the best because it is in macro setting, which:

a. Allows you to get close enough to the object, and

b. Has small focus range. so in the result, you’d get some part clear and some part blurry, which could be very artistic looking if you did it right.

2. Indirect sunlight is the best light source. Shoot your jewelry at your porch or next to your window. Shoot only when there’s enough light that allows your camera to shoot without flash. In underexposure (not enough light) condition, your pictures would come as dark and very grainy. The alternative is to shoot outside when it’s a cloudy day when the sun is hidden behind the clouds (= no indirect sunlight) or in the morning when the sun light is still soft. Noon is not the best time to have an outdoor photo shoot since the sun light is very strong the camera would indicate as overexposure.

How to focus and find out if there is enough light:

In my camera, when I half pressed the shutter button it would try to focus on the object. If there is enough light, there would be no flash icon coming out on the LCD screen. There’s a rectangle image in the middle of the LCD screen that if you’re too close to the object and camera is not able to focus, it would change color to red. If you’re at a good distance, that rectangle would show in green. If there are too much light, the camera would also indicated as Overexposure or Underexposure if no sufficient light is detected. Overexposure is bad because the result image would look washed out and you’d miss a lot of the details of the object.

3. alternative shot is in the afternoon around 3-4 pm. But in this hour, you would get reddish reflection on your jewelry. Long shadows would also at presence in outdoor shoot. You can however, reduce the reddish tone in a photo editing software.

How to maximize the use this Flower mode:

– First select the part you want it to be focused on.

– Bring the selected focus to the center of your LCD screen and half press the button until it beeps and showing a green sign (usually it indicates that the distance is ok, not too close to the object). Red indicates that you’re too close (the whole piece could get blurry as the result if you insisted on taking pics).

– Once you found the focus, while still holding the shutter halfway down, slide the camera slowly to the right/left/top/bottom until you get a good composition. Don’t move it forward or backward because it would change your focus.

– Capture it 😀

– It would be best if you take your pictures on high Mega Pixels setting just in case you’d need to crop your pictures later. I take mine in 5 MP minimal.

So I thought I’d share my experiments so far. I’m a jewelry designer with a little bit passion in photography but definitely not a pro photographer.

Example of results:

1. –> Using flash, just automatic setting. This picture below is not enhanced.

<– notice how the earring look flat and has harsh, ugly shadow on one side. Also the flash flare is not pretty for background.

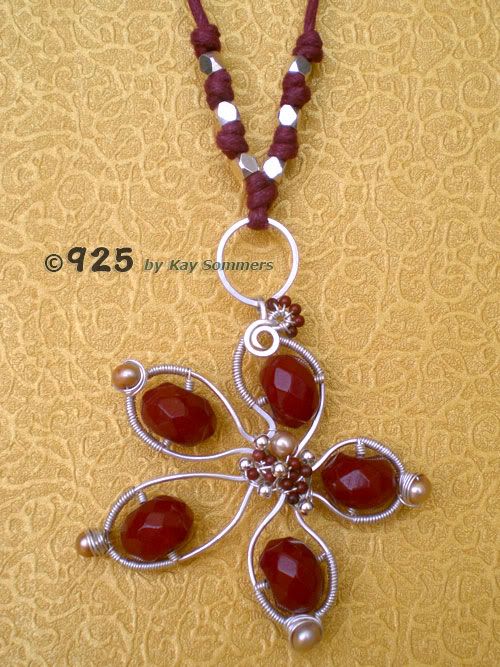
2. –> Afternoon pic, using Flower mode

<– under direct sunlight. long shadows.

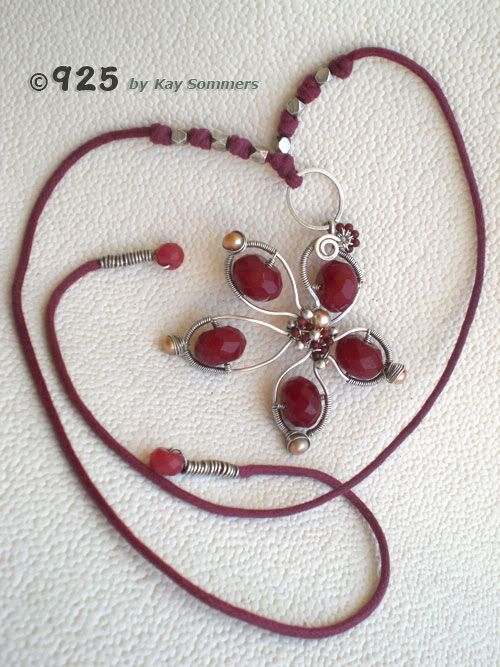
3. –> Using day/window light, Flower setting (the sharp-blur effect only appears at something that has a far enough background).

<– you can see that the focused part is only on a small part of it.

This image has not been enhanced in any digital photo editing software.


WARNING: Not good for picturing diamonds and other faceted precious/semiprecious stones if you want them to shine brilliantly. Please go to a professional jewelry photographer for that.

That’s all folks! If you have any other tips to add, please share on the comments 😀

Follow Me in Twitter!!

I have a Twitter now!! Twit twit twit ^3^

Follow me if you want to be the first to know about new products in my webshops!

See you 😀

-K-

Cocoon Beads

As I keep exploring with wire and what can it do for my advantages, I created this -what I call as- Cocoon Beads along the way. I like this design very much and have been incorporating them in my design -A LOT-. They’re fun, versatile, and easy to make, have this pretty organic touch in it, and they look good almost on everything! I’d like to think that these beads are one of my Signature creations.

They’re made of heavily hammered round wire and then coiled to shape. They’re that easy!

Here are a few examples of how these beads used on a design:

newest variation of Cocoon Beads

newest variation of Cocoon Beads and I LOVE IT!

and in the pictures below are the things i did in the past…

blossom in love set

blossom in love set

sun sparks

sun sparks

clover sherbet

clover sherbet

warrior princess

warrior princess

fruiteelicious

fruiteelicious

and believe it or not, this image below is what started it all!

beetle tribe

beetle tribe

I hope you enjoy the beads as much as I do!! 8D

Scraping Scraps

CURVACIOUS FRILLS NECKLACE

Inspired by one of the forum members, I made this necklace entirely from scrap wires. They weren’t bad wires, mind you, only the orphan wires that were too short for other projects. Cuts from previous projects or experimental wire I used. It was nice that I found another purpose for them. I’ve saved all of my silver to the tiniest cut.

Gots the idea while watching TV and worked on it after the show was ended. Lol. This project including reshaping wire, forging, heavy hammering, and spiraling. I hammered thin the wires, 3-4 times each side using a ball peen hammer. I love hammering.. XD Now let’s hope we don’t have to live in a small apartment when i get to the USA or we’d get a lot of complaints from the neighbors XD “keep it down will ya!”

Making the Smokey Quartz “frills” took quite a while. I gained more respect for others who incorporated a lot of “frills” in their design. I’m satisfied with this project, I must say 😀

This necklace was kinda hard to photograph! lotsa trial and errors. I think I took about almost 30 pictures and only 1/4 of them that are actually decent enough 😛

I added the flowery patterns to distract people staring on my (what it seems like) bare chest and be more focusing on the necklace! lmao. But i acually like the end result. Adds some character to it, IMO 🙂

That’s the end of the story of this one :3 Until next time 😀

Since this is the beginning of a serious business, I figure that i need a “signature box” for my jewelries and make my business card ready whenever anyone ask for it.

I’ve got the boxes ready two days ago and finished the business card last night! I’m not sure about the logo yet but i think i like it =) Only the spiral on the “t” kinda makes me thinking of should I let it stay or make it straight.

I really like the colors! They’re so pretty and soft. I think it would still be suitable for wedding jewelry boxes =) The cool thing about this box is that it requires NO glue. Just folds through and through 😀

The business cards:

The text isn’t as dark as it’s supposed to be because my printer is running out of black ink.

The vector image (watermarked):

Overall, I’m pretty satisfied with them! 😀

I Made Sales!

Last Sunday has proven itself to be a very good day. There was a quite big family gathering with cousins, second cousins and such to celebrate my grandma’s sister’s & husband of their 72nd wedding anniversary! You heard it right! Seventy second! Quite a record huh?

This kind of family gathering usually boring, i must say.. Not much to do and say for the youngins. The older party got all the fun XD But last Sunday was different! Great food overall. I got me 2 portions of Almond Pudding, and then iced Durian fruit so it tasted like ice cream (yum!!), and brought some of the cake home 😀 ah.. heaven.. XD

But to top all of that, I sold three of my jewelries. I brought them along to show my aunt and cousin who usually also helped me redistributing them. They work in fashion industry. I asked my cousin whether she would like to see my jewelries now after we finished eating. So we entered the guest room which was empty and start to dig on my stuffs. Later on her mom joined us, and then the other ladies were coming too.. It was like bees on honey XD Ah, it was so much fun.. 😉 I also got several possible orders.

If this was how a Jewelry Party look like, I’m totally gonna love it! 😀

SOLD ITEMS:

Double Helix
Double Helix
Peacock Swirl
Peacock Swirl
Beach Memory
Beach Memory

COMMISSIONED PIECES:

Enchanted Tree Necklace
Enchanted Tree Necklace ~ went to NZ
Winter Moon
Winter Moon – will go to Singapore

PREVIOUSLY SOLD ITEMS:

Purple Heart
Purple Heart ~ moved to the USA

ON SOMEONE’S WISHLIST:

Amoeba Flower
Amoeba Flower ~ the necklace, not the girl. LOL

Yays! Thanks to those who bought my stuffs 😀

Amoeba Flower

Made of Sterling silver with dyed Jade and Red Jasper.

There’s quite a story behind this piece.. Well, not really, but enough. The flower shaped frame was intentionally for making a different piece that i stopped half way because i didn’t like how it turned out. Two days ago i finally found an idea how to make the frame work. Never waste any silver mentality, ya know. XD I looked at my new collections of natural stone beads and decided that the red ones were perfect for the job. I finished it but there was one thing that bugged me. There was another spiral in top of the small spiral that seem to not fitting the new design. So i cut that off and modified the bail. I really liked the silver bright version but also considering on oxidizing it. Being so dillematic as I am, I asked my friends in the forums to give their inputs. Most of them suggesting on oxidizing it. So i took the plunge and went for it.

Earlier, i got new tips on oxidizing from Michelle, and it worked so damn good my piece were all “black”. There was a moment where i regretted my decision. I tried my hardest to bring the shine back but it was just quite impossible to do. But part of me also liked oxidized silver. So i was really torn. lol. I even used metal cleaning agent to wipe off the oxidation. worked a bit. But I was still not sure. it was night and it didn’t look as good under the lamp.

This morning, i took a pic of it and under the sunlight, i actually like it oxidized!! so HORRAY!!

here are the AFTER pics:

amoeba close up!

amoeba close up!

full view

full view

another full view

another full view

now see it worn :3 on mee…

– as a long necklace

tied on the back

tied on the back

– i be a little more creative on this one.. instead of tying it on the back, i twisted the cord to the front and i got the ends dangle on the sides.

short necklace is short

short necklace is short

i hope you like it :3 see you ❤

oh.. oh.. here are the BEFORE oxidation pics:

shiny silver close up

shiny silver close up

full view

full view

My First Sale :D

Thanks to Evi who commissioned me!!

She liked my Autumn Love Tree of Life necklace and wanted one with copper and tiger’s eye chips. It was up to me to add anything else to match her request and gave orange and red as hints. So i told her my idea and offered a sketch. She agreed. Too bad the sketch was never made due to my excitement! <rofl> I worked on it right away after reading her e-mail XD

But whatever, i made it exactly like what i discribed to her and told her that if she didn’t like it, i’m willing to make another. but she liked it!! so yay!!!!

here it is: (spent around 6m of copper wire)

pendant

pendant

full view: i made everything myself but the chain. i hand braided the brown cord and secured it with coiled wire. i even filed the end of the wire so it wouldn’t stick out.

full view

full view

——————————————

and because I was so pleased with the result of the commissioned pendant that i made a bangle in the similar style.
All swarovski crystals in deep red and orange. Perfect for autumn!

Made in various size of copper wire, this bangle holds its shape well, so i couldn’t be happier 😀
All wire is copper, around 14m long in total, oxidized to show the intricate details. Completely hand made by me.

side view

side view

top view

top view

bottom view

bottom view

i’ve been wearing this for a few hours now (for testing purpose) and my skin is not turning greenish or blackish. so yay!  *w* this bangle is for sale, btw 😉